Generate Twitter Cards From A Next.js Website
After redesigning and rebuilding my website with Next.js, I needed to be able to share blog posts on Twitter.
However, simply sharing links on Twitter isn’t particularly eye-catching or inviting for readers, so I knew I needed to take advantage of Twitter Cards.
This guide will provide you with everything you need to know to get started with Twitter Cards in Next.js, including:
- An overview of Twitter Cards
- How Twitter Cards work under the hood
- Configuring Cards in Next.js
- Using Cards for dynamic pages
- Testing locally
- Testing after deployment
What are Twitter Cards?
Cards provide a really attractive summary of a web page’s content. The summary itself is clickable, redirecting to the page in question, and comes in a choice of several flavours.
Depending on which format you choose, features can include an image, a title, a description and the site’s root domain.

How do Twitter Cards work?
Twitter finds this content by crawling the provided web page and looking for specific meta tags. The tags specify the type of card to be generated, your Twitter username, as well as the content to be included:
<meta name="twitter:card" content="summary_large_image" />
<meta name="twitter:site" content="@lukesprosser" />
<meta name="twitter:title" content="The title of your web page" />
<meta
  name="twitter:description"
  content="A short description summarising the content of your web page."
/>
<meta
  name="twitter:image"
  content="https://images.pexels.com/photos/1194713/pexels-photo-1194713.jpeg"
/>
As you can see, these tags are pretty straightforward. Here’s a brief overview of each one:
twitter:card- The type of card you want to display.twitter:site- The Twitter username for your website.twitter:title- The title of the web page you want to share.twitter:description- A brief summary of the page’s content.twitter:image- A unique image URL representing the page.
For more information on Twitter Cards specifically and the various configuration options available, check out the official docs.
Configuring Cards in Next
Having previously used Gatsby, I was aware of the benefit of Twitter Cards and how the meta tags could be configured, but I needed to figure out how this would translate to Next.js. Turns out it’s actually quite simple!
The meta tags need to be included in the head tag for any page that you wish to share. Fortunately Next makes this pretty easy by providing a next/head component.
Spin up your existing Next.js application on localhost and let’s begin. Open up a page where you’d like to set up a Twitter Card, or create a test page.
Import the next/head component, add it above the page content and populate it with the data you wish to share. Here’s an example:
import Head from 'next/head';

function CoolPage() {
  return (
    <div>
      <Head>
        <meta name='twitter:card' content='summary_large_image' />
        <meta name='twitter:site' content='@lukesprosser' />
        <meta name='twitter:title' content='My cool page' />
        <meta
          name='twitter:description'
          content='This cool page has some pretty cool content.'
        />
        <meta
          name='twitter:image'
          content='https://images.pexels.com/photos/my-cool-image.jpeg'
        />
      </Head>
      <section>
        <article>
          <h1>My cool page</h1>
          <p>My cool page content.</p>
        </article>
      </section>
    </div>
  );
}
One thing to note here is that the image link must be an absolute URL to a live server - we’ll come back to this shortly.
Using Cards for dynamic pages
One of the key benefits of Next.js is how easy it is to build pages automatically within the file system, including dynamic pages using square bracket notation.
But how do we configure Twitter Cards for these dynamic pages, if the content we want to include in the meta tags changes depending on which page is loaded?
This goes back to my original reason for implementing Twitter cards in the first place: sharing blog posts.
The posts on my site are written in markdown and rendered dynamically using Next’s built-in getStaticPaths and getStaticProps methods (among other techniques). So how do we access the content for each post?
Accessing dynamic page content from props
In my case I have a dynamic page named [id].js in the following file location: pages/posts/[id].js. This page pulls all of the markdown content and metadata for each post via props, based on each individual post’s ID (which, in turn, is sourced from its filename e.g. my-cool-post.mdx).
I’m using MDX for my markdown as it offers a number of benefits - you can find out more on their website.
Therefore, it turns out all of the data I needed was already available in props, and I could include it in the Twitter meta tags dynamically using template strings:
// pages/posts/[id].js

export default function Post({ post: { meta, source } }) {
  return (
    <Layout>
      <Head>
        <title>{meta.title}</title>
        <meta name='twitter:card' content='summary_large_image' />
        <meta name='twitter:site' content='@lukesprosser' />
        <meta name='twitter:title' content={meta.title} />
        <meta name='twitter:description' content={meta.excerpt} />
        <meta
          name='twitter:image'
          content={`https://www.lukesprosser.com/_next/image?url=/images/posts/${meta.id}/${meta.cover_image}&w=3840&q=75`}
        />
      </Head>
      <article>
        <h1>{meta.title}</h1>
				...
Above you can see that I’m destructuring the individual post from props, then further destructuring two objects from post: meta and source.
source includes the actual content of the post i.e. all of the processed markdown text.
meta includes all of the metadata, such as the post title, image, date and so on. Here’s an example of that content in the markdown file:
---
title: 'What is HTTP?'
date: '2021-11-02'
author: 'Luke Prosser'
cover_image: 'http.jpg'
image_alt: 'Picture of someone using a search engine'
tags: ['web']
excerpt: "Nowadays we've become so accustomed to seeing the little 'http' string in our browser address bars that we barely even notice it. What actually is HTTP anyway? What does it stand for? What does it do, and how did it even come to be? Let's find out..."
draft: false
---
This is the data that we can utilise to populate the meta tags for the Twitter Card.
In my case, I’m using meta.title and meta.excerpt for the card title and description respectively. The card type and Twitter handle are hardcoded, as these will be the same for all blog posts.
For the image I’m using the post’s id (e.g. my-cool-post) and the image filename (e.g. my-cool-image.jpg) to build up the file path to the image. More on this in the next section.
If you have dynamic pages in your Next.js app, you’ll already be using a similar structure for your pages or blog posts, so you can simply access the data via props.
Using cover images in Twitter Cards
You may have noticed that the image URL I’m building looks a little strange at first glance:
<meta
  name='twitter:image'
  content={`https://www.lukesprosser.com/_next/image?url=/images/posts/${meta.id}/${meta.cover_image}&w=3840&q=75`}
/>
I noted earlier that the image link in a Twitter Card needs to be an absolute URL, however I wanted to use the cover image from each of my blog posts which presented a few more challenges.
You’ll know from working with Next.js that any static files need to be located in the /public folder. In my case I’ve organised all of my post images in /public/images/posts, and then created further folders for each individual post e.g. /public/images/posts/my-cool-post/my-cool-image.jpg.
After some research it turns out that we can link to these relative images by providing a url query parameter that specifies the path to the image.
- The full URL needs to begin with the root domain e.g.
https://www.lukesprosser.com/. - After the root domain we need to link to the
_next/imagedirectory, which admittedly looks a little funky. - This is then followed by the
urlquery parameter and the image path from within the/publicfolder i.e.?url=/images/posts/my-cool-post/my-cool-image.jpg.
You’ll also notice some further query parameters for the image’s width (w) and quality (q) - these values are mandatory and you can find out more about them in the next/image documentation.
Testing locally
Once you have the above in place you’re essentially good to go! However, it would be nice if we could test that everything works before we actually deploy the changes to production.
In order to do this we’ll need a couple of additional tools.
Card validator
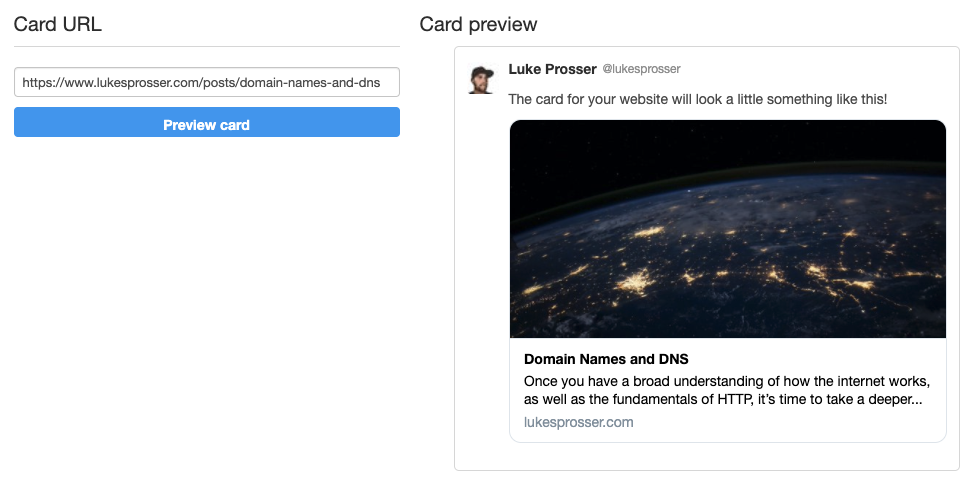
To verify that Twitter is able to crawl the web page and pull the necessary metadata to display the card correctly, we can use Twitter’s extremely handy Card validator application.
Simply enter the URL of the web page you wish to analyse and the validator will do the rest, even rendering a preview of how the card will look, along with some success/error messages.

Up until now we’ve been working locally with our pages served up on localhost. However, this presents a problem. Twitter’s card validator can’t verify local addresses, so we’ll need a way to ‘fake’ a real domain.
ngrok
This is where ngrok comes in. ngrok will enable us to serve our local web application online using a reverse proxy and tunneling.
You’ll need to sign up for a free account in order to obtain an authorisation token. The setup is very straightforward and you can find out more in their Getting Started guide.
To serve up your localhost you can simply run ngrok http 3000 in your terminal, specifying the port number that you’re using for your local app.
This will return an https address e.g. https://123a-45-67-67-89.eu.ngrok.io. Enter this URL into your browser and voila! Your local site is accessible on the web.
Validating your Twitter Card
There’s just one further adjustment we need to make in order to verify that the Card metadata is working.
The image URL is currently set for production deployment as it’s using the live website domain. In my case this is https://www.lukesprosser.com/. We’ll need to change this to the root domain provided by ngrok, for example:
<meta
  name='twitter:image'
  content={`https://123a-45-67-67-89.eu.ngrok.io/_next/image?url=/images/posts/${meta.id}/${meta.cover_image}&w=3840&q=75`}
/>
This will provide the correct image path for the test version of our app. Save your file and ngrok will automatically update the site.
Now simply take the ngrok URL for the page that you’d like to test and plug that into the card validator!
If the card isn’t displaying properly or you see any errors in the logs, go back to your meta tags and check that everything is correct.
It’s worth noting that I did experience some caching issues where my changes weren’t immediately reflected in the card preview. You may need to restart the app and generate a new ngrok address as a workaround. If this is the case, be sure to update the image URL in the meta tags with the new ngrok address!
Testing after deployment
Once you’re happy that everything is working and your Twitter Card is displayed correctly, you’re ready to test the deployed version of your site.
Amend the meta tag image URL once again to reflect your production domain. In my case this is as follows:
<meta
  name='twitter:image'
  content={`https://www.lukesprosser.com/_next/image?url=/images/posts/${meta.id}/${meta.cover_image}&w=3840&q=75`}
/>
Commit your changes, push to production and wait for the production build to complete.
Finally, once the site has published, take the URL of your Twitter-optimised web page(s) and enter it into Twitter’s Card validator to double check that everything is a-ok.
Once confirmed, compose a new tweet and you should see the Twitter Card rendered with all of your page summary information! Note that it may take a few seconds for this to load, as the Twitter crawlers need time to process the page.

Conclusion
There you have it! A working solution to generate Twitter Cards from a Next.js website or application.
As an added bonus, we also learned about meta tags, crawlers, local testing, and tunneling using ngrok.
To take this a step further you could look to take advantage of environment variables in your Next.js app to improve the process of switching between local and production domains for testing the image URL.